Screen casting is the act of recording your desktop while you do something, for example, running an application, replicating a test-case scenario or creating a training video, etc. Optionally you may or may not want your voice being recorded along with the video. Whilst there are many free and popular tools available for Windows to do such a task, in the Linux world the de-facto standard is a nifty little program called recordMyDesktop. Apart from a command line interface, it also has a very simple but elegant GUI that lets you easily create a screencast with audio recording enabled, while also providing you the option to specify some advanced settings such as screen co-ordinates (the area on your desktop you want recorded), audio/video input devices and the number of channels:
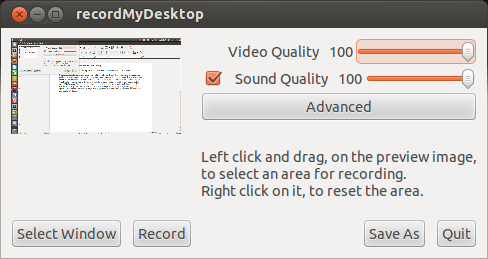
The above image shows recordMyDesktop program running on my Ubuntu 12.04 Linux distro. All you have to do is set the video quality and optionally set the sound quality if you also need voice recording. Most of the time, there is no need to open Advanced Settings. A few scenarios I can think of is where you want to specify an explicit FPS (Frames per second) value, apart from the default which is 15. Or else, you want to specify an explicit screen resolution.
There is also a feature that enables you to record a single window instead of the entire desktop. Just use the select “window button” on bottom left corner to do so.
Once the recording is done, the program encodes the video in .ogv (Ogg Vorbis) format as saves in your home folder with the filename, “out-n.ogv”. Ogg Vorbis is a pretty standard video format most modern programs are able to play.
Installing this program on your linux desktop is pretty easy. Depending on your package management system, this is usually done by issuing a single command in your terminal:
sudo apt-get install recordMyDesktop
This is for apt-based distros such as Debian and Ubuntu. On Fedora you may use yum, or zypper on openSUSE.
